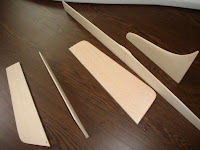
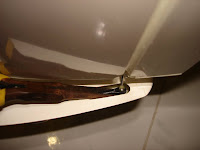
Wow, this fish kit actually requires quite a bit of work, much more than rest of my other gliders! Time to for some sanding and shaping.
The TE and balsa TE need to be sanded flush with the wings.
Sand the balsa tail bits down to get a airfoil shape. Improvised sanding block and stand. Lots of dust everywhere. Start with 80grit sand paper and finish off with 400grit
Sand and shape, hands and shoulder started to ache.
Have to do the fuse too... This EPP is stubborn stuff unlike balsa.
Have a vacuum cleaner ready
Starting to get fishy
Wednesday, December 26, 2007
Saturday, December 22, 2007
Le Fish
One thing great about slope is there are so many flying types and planes available, speed, scale, thermal, etc. One type that is getting popular particularly in the US, Europe is slope aerobatics.I not talking about the basic rolls and loops, i meant 3D style aerobatics - flat spins, snap rolls, blenders, rolling circles and even Knife edge, yes knife edge.
Do that at the slope, close in your face and you have what the French called Voltige Très Près du Relief (VTPR) which, loosely translated, is "aerobatics really close to the ground". This minitoon video will give an insight what VTPR is about.
It has been great fun doing close range stuns with the Weasel and i wanted more, enter Le Fish! . Inspired in equal parts by fullscale aerobatics gliders, the French VTPR phenomenon, and the desire for an EPP glider capable of unlimited aerobatics performance, Le fish is original design by American Steve Lange.
This plane is directly inspired by the MiniToons, the Voltij, and all the other very cool French aerobatic gliders that share a similar "fish" design. Steve has partnered Jack at www.leadingedgegliders.com and made this plane available to all as a kit. He also has a cool site at www.slopeaerobatics.com with some great videos. Got poisoned by those videos, and clicked the order button. Ops...
Here's the kit. A set of EPP wing cores, EPP fuslage, CF spars, balsa tail bits, misc hardware. I plan to build it light as possible as our slope conditions are not that great although we do get the occasional huge lifts, also the slope is slanted at a gentle angle and does not generate those vertical lifts that are great to perform VTPR.
Balsa tail bits
Misc hardware
Wing cores came with pre-cut slots for the CF spars
Glue that works well with EPP is Goop. Its a very strong contact adhesive which remains flexible when dried. One caution make sure area is well ventilated as Goop gives off not-so-nice vapours as it dries.
Glue the wings together with Goop and wait for it to dry.
Goop in the 2 CF spars and place the wings on the wing beds to ensure they are straight n true.
Stack weights on the wing beds while the Goop dries
Some parts of the CF spars didn't contact well with the wings so used thin CA and flooded the gaps. After its dried, glue on the hard wood trailing edge and balsa TE.
Labels:
Le Fish,
Le Fish build,
Slope
Saturday, December 15, 2007
Salto - Fuslage
After that good weekend of flying, the real raining season started. Down pours everyday, took the chance to finish up the salto. Started on the V-tail and work backwards to the servo tray to ensure a perfect fit.
The V-tails came with a set of torque rods for controls.
Glue the torque rods in with epoxy, make sure they are 90 degree when view from front and side.
Epoxy in a link ball to the ends, raptor link balls used. Note the distance between the two link balls. This will be used for the servo tray template later on.
They are connected to the servos in front via CF tube. 6x4mm CF tubes were used as they are quite stiff, less slop. The end of the CF tube was a raptor ball link, glued into a short section of 4x2mm CF as spacer.
Its abit tricky to clip the ball link onto the ball , used a long nose plier to hold onto the CF tube through the small gap at the tail.
Made a template for the servo tray in front. The distance between the link balls was 20mm. Use this to ensure equal distance at the servo end so to get the correct geometry between the servo horn, CF tube and V-tail torque rod.
Trial fit with the servos. Adjust and mark out positions then cut out the servo tray from ply wood.
Connect up the V-tail with the CF tubes, the other end of CF tube glued with threaded rods to thread into clevis for control horn. Ensure V-tail at neutral then epoxy in the servo tray. Also epoxy in the connectors for the wing servos.
To keep the antenna straight in the fuselage, use some plastic tubing.
Cut the wing servo covers to size.
Had to add more than 200grams of weight in the nose for balance. Fishing weights and blue tack work great. CG set at around 55~60mm from LE.
Finally done, a coat of polish to finish up. Now we wait for good conditions to madien
Labels:
Salto,
Salto build,
Slope
Tuesday, December 04, 2007
Great start to slope season
What a start, the slope season started the way it ended, with a blast! And it came early. Usually it will go through a transition period for the wind to build up but not this year. The winds just started blasting strongly out of nowhere, just that the direction is abit off from the left and abit cold at times.
Well, the die hards are well prepared. Some came with new planes, some came with refurbished planes, some just came to look see and say hi.
Its more than just flying at the slope, as what one bro said "This glider flying is somewhat special. We meet for 3 months and don't see each other for 9 months, when we meet again, some trying to remember each other's name but immediately the conversation continues like we only met yesterday."
Every year for 3 months, men from all over the island make their yearly pilgrimage up the scared hill.
The pavilion, where we sometimes huddle together to hide from the rain.
The whole gang is here.
While we enjoyed ourselves, i notice there were some construction on both sides of the hill, a face lift perhaps. Lets hope they preserved the hill, its the only one that allowed this kind of graceful flying.
Labels:
Slope,
Slope news
Friday, November 30, 2007
Something fishy...
Something fishy arrived last week...
7x5USD + 4x1USd worth of stamps
All the way from Kanas, USA
What could it be???
Fishes!
7x5USD + 4x1USd worth of stamps
All the way from Kanas, USA
What could it be???
Fishes!
Labels:
Fishes,
Slope news
Monday, November 26, 2007
Salto H101
Last year around Nov, i ordered the discus, banana and the salto. Well time flies, the discus and banana have flown, now its time for salto. Reason i got the salto was i wanted something different from the discus, a change of flavour, something faster and slick. It looked fast n slick.
This is the 2.4m 1:6 scale by Baudis model. Here's the specs,
The kit - a pair of wings, fuselage, V-tail and some misc hardware. Usually, the lesser the pieces the higher the price. lol.
Dry fit
The stuff going in - Hs65 on the ailerons, JR DS362 for the rudder-elavator V-tail, Great-planes nylon control horns, FG wing covers, 3 pin deans connector and Berg 7 rx. Going to reuse the same battery from the discus.
On with the build, for fix-wings, it alwvayz startz viz zhe vingz.
A pair of beautiful straight wings. (Madien day must buy 4D.)
Date of birth.
The servo bay is fairly close to the hinge line, had to cut out abit of the top corner to prevent binding. Test fit everything first before marking out where the control horn go, glue it in with some epoxy + chopped up FG mix.
Use transparency and mark out position of 3 pin dean connector. Drill hole for it. Flip the transparency over n do the same for the wings. This will ensure the position for the connectors matched up.
I 'm going to do plug n fly wings using the 3 pin deans connectors as similar to what i have done with the discus. Suffer once, enjoy later. Made twisted extension wire, solder to servo, pull through the hole and solder on the connector
Made the connector for the fuselage side. -> So that can use it to center the servo. All this wirings and soldering actually took up quite a bit of time, 2~3 hrs.
Center the servo, glue it in place with epoxy mix. Servo was first wrapped with layer of masking tape. Notice the servo horn is angled towards the front. This is to get differential throws, since we need less down throw and more up aileron travel.
Glue the connector in and make sure its flushed except the 3 pins sticking out.
Wings considered done less attaching the servo covers later on. Next is the fuselage, that will be the tricky part...
Labels:
Salto,
Salto build,
Slope
Subscribe to:
Posts (Atom)